
Till now we have been used standard API kubernetes resources such as deployments, replicasets, secrets, services, ingresses… etc to define all the required configurations for the integrated Load Balancing services that AVI Service Engines eventually provides. Very oftenly the native K8s API is not rich enough to have a corresponding object to configure advance configuration in the external integrated system (e.g. the external Load Balancer in our case) and this is when the Custom Resource Definition or CRD come into scene. A CRD is a common way to extend the K8s API with aditional custom schemas. The AKO operator supports some CRD objects to define extra configuracion that allows the end user to customize even more the service. Another common method to personalize the required configuration is through the use of annotations or even matchlabels, however, the usage of CRD is a best approach since, among other benefits, can be integrated with the RBAC native policies in k8s to add extra control and access to these new custom resources.
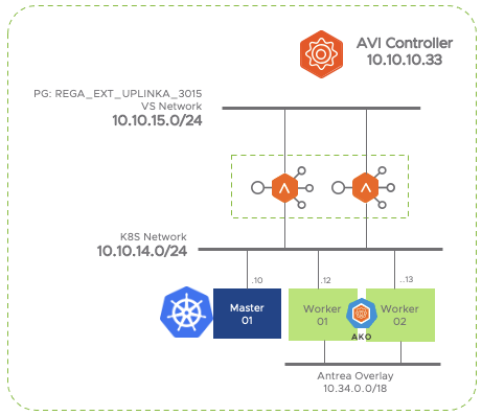
This guide is based on the testbed scenario represented in above figure and uses a single kubernetes cluster and a single AVI controller. Antrea is selected as CNI inside the Kubernetes cluster.
AKO uses two categories of CRD
- Layer 7 CRDs.- provides customization for L7 Ingress resources
- HostRule CRD.- provides extra settings to configure the Virtual Service
- HTTPRule CRD.- provides extra settings to customize the Pool or backend associated objects
- Infrastructure CRDs.- provides extra customization for Infrastructure
- AviInfraSetting CRD.- Defines L4/L7 infrastructure related parameters such as Service Engine Groups, VIP Network… etc)
This article will cover in detail the first of them which is the HostRule CRD. The subsequent articles of this series go through HTTPRule and AviInfraSetting CRD.
Upgrading existing AKO Custom Resource Definitions
As mentioned in previous articles we leverage helm3 to install and manages AKO related packages. Note that when we perform a release upgrade, helm3 does not upgrade the CRDs. So, whenever you upgrade a release, run the following command to ensure you are getting the last version of CRD:
helm template ako/ako --version 1.4.2 --include-crds --output-dir $HOME
wrote /home/ubuntu/ako/crds/networking.x-k8s.io_gateways.yaml
wrote /home/ubuntu/ako/crds/ako.vmware.com_hostrules.yaml
wrote /home/ubuntu/ako/crds/ako.vmware.com_aviinfrasettings.yaml
wrote /home/ubuntu/ako/crds/ako.vmware.com_httprules.yaml
wrote /home/ubuntu/ako/crds/networking.x-k8s.io_gatewayclasses.yaml
wrote /home/ubuntu/ako/templates/serviceaccount.yaml
wrote /home/ubuntu/ako/templates/secret.yaml
wrote /home/ubuntu/ako/templates/configmap.yaml
wrote /home/ubuntu/ako/templates/clusterrole.yaml
wrote /home/ubuntu/ako/templates/clusterrolebinding.yaml
wrote /home/ubuntu/ako/templates/statefulset.yaml
wrote /home/ubuntu/ako/templates/tests/test-connection.yaml
Once you have downloaded, just apply them using kubectl apply command.
kubectl apply -f $HOME/ako/crds/
customresourcedefinition.apiextensions.k8s.io/aviinfrasettings.ako.vmware.com created
Warning: resource customresourcedefinitions/hostrules.ako.vmware.com is missing the kubectl.kubernetes.io/last-applied-configuration annotation which is required by kubectl apply. kubectl apply should only be used on resources created declaratively by either kubectl create --save-config or kubectl apply. The missing annotation will be patched automatically.
customresourcedefinition.apiextensions.k8s.io/hostrules.ako.vmware.com configured
Warning: resource customresourcedefinitions/httprules.ako.vmware.com is missing the kubectl.kubernetes.io/last-applied-configuration annotation which is required by kubectl apply. kubectl apply should only be used on resources created declaratively by either kubectl create --save-config or kubectl apply. The missing annotation will be patched automatically.
customresourcedefinition.apiextensions.k8s.io/httprules.ako.vmware.com configured
customresourcedefinition.apiextensions.k8s.io/gatewayclasses.networking.x-k8s.io created
customresourcedefinition.apiextensions.k8s.io/gateways.networking.x-k8s.io created
Once upgraded, relaunch AKO using the values.yaml according to your setup. For our testbed scenario I will use a set of values you can find here.
Exploring the HostRule CRD
Let’s start with the HostRule CRD one that is used to provide extra configuracion for the Virtual Host properties. The virtual host is a logical construction for hosting multiple FQDNs on a single virtual service definition. This allows one VS to share some resources and properties among multiple Virtual Hosts. The CRD object as any other kubernetes resource is configured using declarative yaml files and it looks this:
apiVersion: ako.vmware.com/v1alpha1
kind: HostRule
metadata:
  name: my-host-rule
  namespace: red
spec:
  virtualhost:
    fqdn: foo.com # mandatory
    enableVirtualHost: true
    tls: # optional
      sslKeyCertificate:
        name: avi-ssl-key-cert
        type: ref
      sslProfile: avi-ssl-profile
      termination: edge
    httpPolicy:
      policySets:
      - avi-secure-policy-ref
      overwrite: false
    datascripts:
    - avi-datascript-redirect-app1
    wafPolicy: avi-waf-policy
    applicationProfile: avi-app-ref
    analyticsProfile: avi-analytics-ref
    errorPageProfile: avi-errorpage-ref
Before going through the different settings to check how they affect to the Virtual Service configuration we need to create an application for testing. I will create a secure Ingress object to expose the a deployment that will run the Ghost application. Ghost is a quite popular app and one of the most versatile open source content management systems. First define the deployment, this time using imperative commands.
kubectl create deployment ghost --image=ghost --replicas=3
deployment.apps/ghost created
Now expose the application in port 2368 which is the port used by the ghost application.
kubectl expose deployment ghost --port=2368 --target-port=2368
service/ghost exposed
The secure ingress definition requires a secret resource in kubernetes. An easy way to generate the required cryptographic stuff is by using a simple script including the Openssl commands created and availabe here. Just copy the script, make it executable and launch it as shown below using your own data.
./create_secret.sh ghost /C=ES/ST=Madrid/CN=ghost.avi.iberia.local defaultIf all goes well you should have a new kubernetes secret tls object that you can verify by using kubectcl commands as shown below
kubectl describe secret ghost
Name:         ghost-secret
Namespace:    default
Labels:       <none>
Annotations:  <none>

Type:  kubernetes.io/tls

Data
====
tls.crt:  570 bytes
tls.key:  227 bytes
Now we can specify the ingress yaml definition including the certificate, name, ports and other relevant attributes.
apiVersion: networking.k8s.io/v1
kind: Ingress
metadata:
  name: ghost
  labels:
    app: ghost
    app: gslb
spec:
  tls:
  - hosts:
    - ghost.avi.iberia.local
    secretName: ghost-secret
  rules:
    - host: ghost.avi.iberia.local
      http:
        paths:
        - path: /
          pathType: Prefix
          backend:
            service:
              name: ghost
              port:
                number: 2368
In a few seconds after applying you should see the beatiful graphical representation of the declared ingress state in the AVI Controller GUI.

And naturally, we can check the if the ghost application is up and running by loading the web interface at https://ghost.avi.iberia.local in my case.

Click on the lock Non secure icon in the address bar of the brower and show the certificate. Verify the ingress is using the secret we created that should corresponds to our kubernetes

Now let’s play with the CRD definitions.
enableVirtualHost
The first setting is very straightforward and basically is used as a flag to change the administrative status of the Virtual Service. This is a simple way to delegate the actual status of the ingress service to the kubernetes administrator. To create the HostRule you need to create a yaml file with the following content and apply it using kubectl apply command. The new HostRule object will be named ghost.
apiVersion: ako.vmware.com/v1alpha1
kind: HostRule
metadata:
  name: ghost
  namespace: default
spec:
  virtualhost:
    fqdn: ghost.avi.iberia.local
    enableVirtualHost: true
Once our HostRule resource is created you can explore the actual status by using regular kubectl command line as shown below
kubectl get HostRule ghost -o yaml
apiVersion: ako.vmware.com/v1alpha1
kind: HostRule
metadata:
  annotations:
    kubectl.kubernetes.io/last-applied-configuration: |
      {"apiVersion":"ako.vmware.com/v1alpha1","kind":"HostRule","metadata":{"annotations":{},"name":"ghost","namespace":"default"},"spec":{"virtualhost":{"enableVirtualHost":true,"fqdn":"ghost.avi.iberia.local"}}}
  creationTimestamp: "2021-05-19T17:51:09Z"
  generation: 1
  name: ghost
  namespace: default
  resourceVersion: "10590334"
  uid: 6dd06a15-33c2-4c9c-970e-ed5a21a81ce6
spec:
  virtualhost:
    enableVirtualHost: true
    fqdn: ghost.avi.iberia.local
status:
  status: Accepted
Now it’s time to toogle the enableVirtualHost key and set to false to see how it affect to our external Virtual Service in the AVI load balancer. The easiest way is using kubectl edit that will launch your preferred editor (typically vim) to change the definition on the fly.
kubectl edit HostRule ghost
apiVersion: ako.vmware.com/v1alpha1
kind: HostRule
metadata:
  annotations:
    kubectl.kubernetes.io/last-applied-configuration: |
      {"apiVersion":"ako.vmware.com/v1alpha1","kind":"HostRule","metadata":{"annotations":{},"name":"ghost","namespace":"default"},"spec":{"virtualhost":{"enableVirtualHost":true,"fqdn":"ghost.avi.iberia.local"}}}
  creationTimestamp: "2021-05-19T17:51:09Z"
  generation: 11
  name: ghost
  namespace: default
  resourceVersion: "12449394"
  uid: 6dd06a15-33c2-4c9c-970e-ed5a21a81ce6
spec:
  virtualhost:
    enableVirtualHost: false
    fqdn: ghost.avi.iberia.local
status:
  status: Accepted
Save the file using the classical <Esc>:wq! sequence if you are using vim editor and now you can check verify in th AVI GUI how this affect to the status of the Virtual Service.

If you click in the Virtual Service and then click on the pencil icon you can see the Enabled toogle is set to OFF as shown below:

sslKeyCertificate
AKO integration uses the cryptographic information stored in the standard secret kubernetes object and automatically pushes that information to the AVI controller using API calls according to the secure ingress specification. If you want to override this setting you can use the sslKeyCertificate key as part of the HostRule specification to provide alternative information that will be used for the associated ingress object. You can specify both the name of the certificate and also the sslProfile to influence the SSL negotiation parameters.
Till now, the AKO has been translating standard kubernetes objects such as ingress, secrets, deployments into AVI configuration items, in other words, AKO was automated all the required configuration in the AVI controller on our behalf. Generally speaking, when using CRD, the approach is slightly different. Now the AVI Load Balancer administrator must create in advance the required configuration objects to allow the kubernetes administrator to consume the defined policies and configurations as they are defined.
Let’s create this required configuration items from the AVI GUI. First we will check the available system certificates. Navigate to Templates > Security > SSL/TLS Certificates. We will use the System-Default-Cert-EC this time.

Similarly now navigate to Templates > Security > SSL/TLS Profile and create a new SSL Profile. Just for testing purposes select only insecure version such as SSL 3.0 and TLS 1.0 as the TLS version used during TLS handshake

Once the required configuration items are precreated in the AVI GUI you can reference them in the associated yaml file. Use kubectl apply -f to push the new configuration to the HostRule object.
apiVersion: ako.vmware.com/v1alpha1
kind: HostRule
metadata:
  name: ghost
  namespace: default
spec:
  virtualhost:
    fqdn: ghost.avi.iberia.local
    enableVirtualHost: true
    tls:
      sslKeyCertificate:
        name: System-Default-Cert-EC
        type: ref
      sslProfile: CUSTOM_SSL_PROFILE
      termination: edge
If you navigate to the ghost Virtual Service in the AVI GUI you can verify in the SSL Settings section how the new configuration has been successfully applied.

Additionally, if you use a browser and open the certificate you can see how the Virtual Service is using the System-Default-Cert-EC we have just configured by the HostRule CRD.

To verify the TLS handshaking according to the SSL Profile specification just use curl. Notice how the output shows TLS version 1.0 has been used to establish the secure channel.
curl -vi -k https://ghost.avi.iberia.local
*   Trying 10.10.15.162:443...
* TCP_NODELAY set
* Connected to ghost.avi.iberia.local (10.10.15.162) port 443 (#0)
* ALPN, offering h2
* ALPN, offering http/1.1
* successfully set certificate verify locations:
*   CAfile: /etc/ssl/certs/ca-certificates.crt
  CApath: none
* TLSv1.3 (OUT), TLS handshake, Client hello (1):
* TLSv1.3 (IN), TLS handshake, Server hello (2):
* TLSv1.0 (IN), TLS handshake, Certificate (11):
* TLSv1.0 (IN), TLS handshake, Server key exchange (12):
* TLSv1.0 (IN), TLS handshake, Server finished (14):
* TLSv1.0 (OUT), TLS handshake, Client key exchange (16):
* TLSv1.0 (OUT), TLS change cipher, Change cipher spec (1):
* TLSv1.0 (OUT), TLS handshake, Finished (20):
* TLSv1.0 (IN), TLS handshake, Finished (20):
* SSL connection using TLSv1.0 / ECDHE-ECDSA-AES256-SHA
* ALPN, server accepted to use http/1.1
* Server certificate:
*  subject: CN=System Default EC Cert
*  start date: Feb 23 19:02:20 2021 GMT
*  expire date: Feb 21 19:02:20 2031 GMT
*  issuer: CN=System Default EC Cert
*  SSL certificate verify result: self signed certificate (18), continuing anyway.
> GET / HTTP/1.1
> Host: ghost.avi.iberia.local
> User-Agent: curl/7.67.0
> Accept: */*
httpPolicy
The AVI HTTP Policy is a feature that allow advanced customization of network layer security, HTTP security, HTTP requests, and HTTP responses. A policy may be used to control security, client request attributes, or server response attributes. Policies are comprised of matches and actions. If the match condition is satisfied then AVI performs the corresponding action.
A full description of the power of the httpPolicy is available in the AVI documentation page here.
The configuration of an httpPolicy is not as easy as the other AVI configuration elementes because part is the httppolicyset object is not shared neither explicitly populated in the AVI GUI which means you can only share policy sets and attach multiple policy sets to a VS through the CLI/API.
By default, AKO creates a HTTP Policy Set using the API when a new ingress object is created and it will be unique to the VS but, as mentioned, is not shown in the GUI as part of the VS definition.
Let’s try to define the http policy. Open a SSH connection to the AVI Controller IP address, log in and launch the AVI CLI Shell by issuing a shell command. The prompt will change indicating you are now accessing the full AVI CLI. Now configure the new httpPolicySet This time we will create a network policy to add traffic control for security purposes. Let define a rule with a MATCH statement that matches any request with a header equals to ghost.avi.iberia.local and if the condition is met the associated ACTION will be a rate-limit allowing only up to ten connections per second. For any traffic out of contract AVI will send a local response with a 429 code. To configure just paste the below command lines.
[admin:10-10-10-33]: configure httppolicyset MY_RATE_LIMIT
 http_security_policy
  rules
   name RATE_LIMIT_10CPS
   index 0
    match
     host_hdr
      match_criteria HDR_EQUALS
      match_case insensitive
      value ghost.avi.iberia.local
	  exit
	 exit
	action
	 action http_security_action_rate_limit
	 rate_profile
	  rate_limiter
	   count 10
	   period 1
	   burst_sz 0
	   exit
	  action
	   type rl_action_local_rsp
	   status_code http_local_response_status_code_429
	   exit
	  exit
	exit
   exit
  exit
 save
After saving a summary page is displayed indicating the resulting configuration
[admin:10-10-10-33]: httppolicyset>  save
+------------------------+----------------------------------------------------
| Field                  | Value
+------------------------+----------------------------------------------------
| uuid                   | httppolicyset-6a33d859-d823-4748-9701-727fa99345b5
| name                   | MY_RATE_LIMIT
| http_security_policy   |
|   rules[1]             |
|     name               | RATE_LIMIT_10CPS
|     index              | 0
|     enable             | True
|     match              |
|       host_hdr         |
|         match_criteria | HDR_EQUALS
|         match_case     | INSENSITIVE
|         value[1]       | ghost.avi.iberia.local
|     action             |
|       action           | HTTP_SECURITY_ACTION_RATE_LIMIT
|       rate_profile     |
|         rate_limiter   |
|           count        | 10
|           period       | 1 sec
|           burst_sz     | 0
|         action         |
|           type         | RL_ACTION_LOCAL_RSP
|           status_code  | HTTP_LOCAL_RESPONSE_STATUS_CODE_429
| is_internal_policy     | False
| tenant_ref             | admin
+------------------------+----------------------------------------------------+
You can also interrogate the AVI API navigating to the following URL https://site1-avi.regiona.iberia.local/api/httppolicyset?name=MY_RATE_LIMIT. To make this work you need to open first a session to the AVI GUI in the same browser to authorize the API access requests.

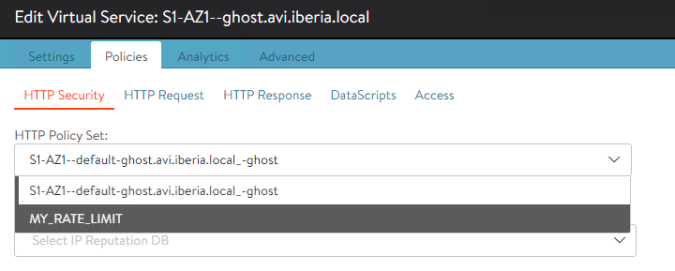
Now that the httppolicyset configuration item is created you can simply attach to the Virtual Service using the HostRule object as previously explained. Edit the yaml file and apply the new configuration or edit inline using the kubect edit comand.
kubectl edit HostRule ghost
apiVersion: ako.vmware.com/v1alpha1
kind: HostRule
metadata:
  name: ghost
  namespace: default
spec:
  virtualhost:
    enableVirtualHost: true
    fqdn: ghost.avi.iberia.local
    tls:
      sslKeyCertificate:
        name: System-Default-Cert-EC
        type: ref
      sslProfile: CUSTOM_SSL_PROFILE
      termination: edge
    httpPolicy:
      policySets:
      - MY_RATE_LIMIT
      overwrite: false
As soon as you apply the new configure navigate to the Virtual Service configuration and click on the Policies tab. A dropdown menu appears now that shows the default Policy Set applied by AKO along with the new custom Policy set named MY_RATE_LIMIT.
AKO currently creates an httppolicyset that uses objects on the SNI child virtual services to route traffic based on host/path matches. These rules are always at a lower index than the httppolicyset objects specified in the CRD object. If you want to overwrite all httppolicyset objects on a SNI virtual service with the ones specified in the HostRule CRD, set the overwrite flag to True.
To check if our rate-limiting is actually working you can use the Apache Bench tool to inject some traffic into the virtual service. The below command will sent three million of request with a concurrency value set to 100.
ab -c 100 -n 300000 https://ghost.avi.iberia.local/Try to access to the ghost application using your browser while the test is still progress and you are likely to receive a 429 Too Many Request error code indicating the rate limiting is working as expected.

You can also verify the rate-limiter in action using the AVI Anlytics. In this case the graph below clearly shows how AVI is sending a 4XX response for the 98,7% of most of the requests.

If you want to check even deeper click on any of the 429 response and you will verify how the RATE_LIMIT_10CPS rule is the responsible for this response sent to the client.

dataScript
DataScripts is the most powerful mechanism to add extra security and customization to our virtual services. They are comprised of any number of function or method calls which can be used to inspect and act on traffic flowing through a virtual service. DataScript’s functions are exposed via Lua libraries and grouped into modules: string, vs, http, pool, ssl and crypto. You can find dozens of samples at the AVI github site here.
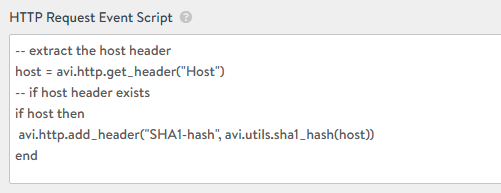
For this example, we will use a simple script to provide message signature using a Hash-based Message Authenticaton code (HMAC) mechanism. This is a common method to add extra security for a RESTful API service by signing your message based on a shared secret between the client and the service. For the sake of simplicity we will use an easy script that will extract the host header of the server response and will generate a new header with the computed hashing of this value. We will use the SHA algorithm to calculate the hashing.
Again, in order to attach the Datascript to our application we need to precreate the corresponding configuration item in the AVI controller using any method (GUI, API, CLI). This time we will use the GUI. Navigate to Templates > Scripts > DataScripts > CREATE. Scroll down to the HTTP Response Event Script section and put above script that extract the Host header and then create a new http header named SHA1-hash with the computed SHA hashing applied to the host header value.
Select a proper name for this script since we need to reference it from the HostRule CRD object. I have named Compute_Host_HMAC. Now edit again the HostRule and apply the new configuration.
kubectl edit HostRule ghost

apiVersion: ako.vmware.com/v1alpha1
kind: HostRule
metadata:
  name: ghost
  namespace: default
spec:
  virtualhost:
    enableVirtualHost: true
    fqdn: ghost.avi.iberia.local
    tls:
      sslKeyCertificate:
        name: System-Default-Cert-EC
        type: ref
      sslProfile: CUSTOM_SSL_PROFILE
      termination: edge
    httpPolicy:
      policySets:
      - MY_RATE_LIMIT
      overwrite: false
    datascripts:
    - Compute_Host_HMAC
Once the HostRule has been modified we can verify in the AVI GUI how the new DataScript has been applied. Edit the Virtual Service and go to Policies > DataScripts

To check if the datascript is working as expected browse to the ghost application to generate some traffic and open one of the transactions

Now click on View All Headers link at the right of the screen to inspect the Headers and you should see in the Headers sent to server section how a new custom header named SHA1-hash has been sent containing the computed value of the host header found in the request as expected according to the DataScript function.

wafPolicy
Web Application Firewall is an additional L7 security layer to protect applications from external attackers. AVI uses a very powerful software WAF solution and provides scalable security, threat detection, and application protection. WAF policy is based on a specific set of rules that protects the application.
Apart from the classical technices that uses signature matching to check if the attacker is trying to exploit a known vulnerability by a known attack and technique, AVI also uses a sophisticated technology called iWAF that take advantage of Artificial Intelligence models with the goal of clasifying the good traffic from the potentially dangerous using unsupervised machine learning models. This modern method is very useful not only to alleviate the operative burden that tuning a WAF policy using legacy methods implies but also to mitigate false positives ocurrences.
As seen with previous examples we need to predefine a base WAF Policy in AVI to allow the kubernetes admins to consume or reference them by using the HostRule CRD corresponding specification. Let’s create the WAF Policy. Navigate now to Templates > WAF > WAF Profile > CREATE
Here we can assign GHOST-WAF-PROFILE as the WAF Profile name and other general settings for our polity such as HTTP versions, Methods, Content-Types, Extensions… etc. I will using default settings so far.

Now we can create our WAF Policy from Templates > WAF > WAF Policy > CREATE. Again we will use default settings and we keep the Detection Mode (just flag the suspicious requests) instead of Enforcement (sent a 403 response code and deny access). We will use GHOST-WAF-POLICY as the WAF Policy name and it will be referenced in the HostRule definition.

Now that all the preconfiguration tasks has been completed we are ready to attach the WAF policy by using the HostRule CRD corresponding setting. Edit the existing HostRule object and modify accordingly as shown below:
kubectl edit HostRule ghost

apiVersion: ako.vmware.com/v1alpha1
kind: HostRule
metadata:
  name: ghost
  namespace: default
spec:
  virtualhost:
    enableVirtualHost: true
    fqdn: ghost.avi.iberia.local
    tls:
      sslKeyCertificate:
        name: System-Default-Cert-EC
        type: ref
      sslProfile: CUSTOM_SSL_PROFILE
      termination: edge
    httpPolicy:
      policySets:
      - MY_RATE_LIMIT
      overwrite: false
    datascripts:
    - Compute_Host_HMAC
    wafPolicy: GHOST-WAF-POLICY
As soon as the new settings are applied a new shield icon appears next to the green rounded symbol that represents the Virtual Service object in the AVI GUI. The shield confirms that a WAF policy has been attached to this particular VS.

If you navigate to the Virtual Service properties you can verify the WAF Policy has been configured as expected.
Just to play a little bit with the Positive Learning Module of the AVI iWAF feature, click on the Learning tab and drag the button to enable the WAF Learning. A warning indicating a Learning Group is required appears as shown below.

Click on Create Learning Group to create this configuration that allows the system to create the baseline of the known-good behaviour according to the learnt traffic.

Assign a new name such as Ghost-PSM-Group and enable the Learning Group checkbox. Left the rest settings as default.

Return to the previous screen and set some settings that allows to speed up the learning process as shown below:

The parameters we are tuning above are specifically
- Sampling = 100 % .- All requests are analyzed and used to the train the ML model
- Update_interval = 1 .- Time for the Service Engine to collect data before sending to the learning module
- min_hits_to_learn = 10 .- Specify the minimun number of ocurrences to consider a relevant hit. A lower value allow learning to happen faster. Default is 10k.
WAF Policy is ready to learn and will autopromote rules according to observed traffic. In a production environment it can take some time to have enough samples to consider a good policy. To produce some traffic and get our applications quite ready before goint to production stage it’s recomended to perform an active scanning over our web application. We will use here one of the most popular scanner which is OWASP Zed Attack Proxy (a.k.a ZAP Proxy). You can find more information of this tool at the zap official site here. Using command line as shown below perform a quick scanning over our application.
/usr/share/zaproxy/zap.sh -cmd -quickurl https://ghost.avi.iberia.local -quickprogress
Found Java version 11.0.11-ea
Available memory: 7966 MB
Using JVM args: -Xmx1991m
Ignoring legacy log4j.properties file, backup already exists.
Accessing URL
Using traditional spider
Active scanning
[===============     ] 79% /
After some scanning we can see explore the discovered locations (paths) that our web application uses. These discovered locations will be used to understand how a legitimate traffic should behave and will be the input for our AI based classifier. By using the right amount of data this would help the system to gain accurary to clasiffy known-good behaviour from anomalies and take action without any manual tweaking of the WAF Policies.

Additionally, the ZAP active scanner attempts to find potential vulnerabilities by using known attacks against the specified target. From the analytics page you can now see the WAF Tags that are associated to the scanner activities and are used to classify the different attack techniques observed.

You can also see how the active scanner attempts matches with specific WAF signatures.

And if you want to go deeper you can pick up one of the flagged requests to see the specific matching signature.

And also you can create exceptions for instance in case of false positives if needed.

Note how a new WAF tab is now available as part of the embedded analytics. If you click on it you can see some insights related to the WAF attack historical trends as well as more specific details.

Lastly, enable the enforcement mode in our WAF Policy.

Open one of the FLAGGED requests detected during the active scanning while in Detection mode and replicate the same request from the browser. In this case I have chosen one of the observed XSS attack attempts using the above URL. If you try to navigate to the target, the WAF engine now will block the access and will generate a 403 Forbidden response back to the client as shown below

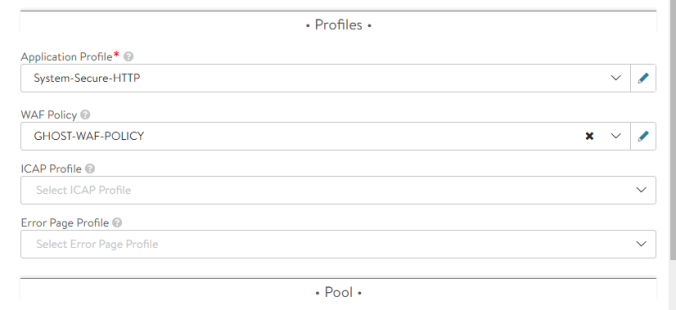
applicationProfile
The application profiles are used to change the behavior of virtual services, based on application type. By default the system uses the System-Secure-HTTP with common settings including SSL Everywhere feature set that ensures you use the best-in-class security methods for HTTPS such includin HSTS, Securing Cookies, X-Forwarded-Proto among other.
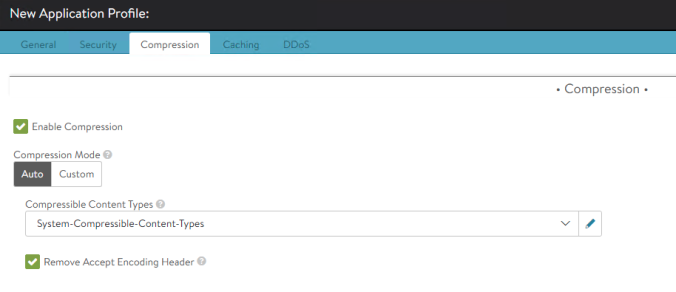
To test how we can use the application profiles from the HostRule CRD object, preconfigure a new Application Profile that we will call GHOST-HTTPS-APP-PROFILE. As an example I am tuning here the compression setting and checking the Remove Accept Encoding Header for the traffic sent to the backend server. This is a method for offloading the content compression to the AVI Load Balancer in order to alleviate the processing at the end server.
Push the configuration to the Virtual Service by adding the relevant information to our HostRule CRD using kubectl edit command as shown:
kubectl edit HostRule ghost

apiVersion: ako.vmware.com/v1alpha1
kind: HostRule
metadata:
  name: ghost
  namespace: default
spec:
  virtualhost:
    enableVirtualHost: true
    fqdn: ghost.avi.iberia.local
    tls:
      sslKeyCertificate:
        name: System-Default-Cert-EC
        type: ref
      sslProfile: CUSTOM_SSL_PROFILE
      termination: edge
    httpPolicy:
      policySets:
      - MY_RATE_LIMIT
      overwrite: false
    datascripts:
    - Compute_Host_HMAC
    wafPolicy: GHOST-WAF-POLICY
    applicationProfile: GHOST-HTTPS-APP-PROFILE
As soon as the new configuration is pushed to the CRD, AKO will patch the VS with the new Application Profile setting as you can verify in the GUI.

Generate some traffic, select a recent transaction and show All Headers. Now you can see how the compression related settings specified in the Accept-Encoding header received from client are now suppresed and rewritten by a identity value meaning no encoding.

analyticsProfile
Since each application is different, it may be necessary to modify the analytics profile to set the threshold for satisfactory client experience or omit certain errors or to configure an external collector to send the analytic to. This specific setting can be attached to any of the applications deployed from kubernetes. As in previous examples, we need to preconfigure the relevant items to be able to reference them from the CRD. In that case we can create a custom analyticsProfile that we will call GHOST-ANALYTICS-PROFILE navigating to Templates > Profiles > Analytics. Now define an external source to send our logs via syslog.

As usual, edit the custom ghost HostRule object and add the corresponding lines.
kubectl edit HostRule ghost

apiVersion: ako.vmware.com/v1alpha1
kind: HostRule
metadata:
  name: ghost
  namespace: default
spec:
  virtualhost:
    enableVirtualHost: true
    fqdn: ghost.avi.iberia.local
    tls:
      sslKeyCertificate:
        name: System-Default-Cert-EC
        type: ref
      sslProfile: CUSTOM_SSL_PROFILE
      termination: edge
    httpPolicy:
      policySets:
      - MY_RATE_LIMIT
      overwrite: false
    datascripts:
    - Compute_Host_HMAC
    wafPolicy: GHOST-WAF-POLICY
    applicationProfile: GHOST-HTTPS-APP-PROFILE
    analyticsProfile: GHOST-ANALYTICS-PROFILE
Once done, the Virtual Service will populate the Analytic Profile setting as per our HostRule specification as shown below:

If you have access to the syslog server you can see how AVI is now streaming via Syslog the transactions. Notice the amount of metrics AVI analytics produces as seen below. You can use a BI tool of your choice to further processing and dashboarding with great granularity.
May 26 17:40:01 AVI-CONTROLLER S1-AZ1--ghost.avi.iberia.local[0]: {"adf":false,"significant":0,"udf":false,"virtualservice":"virtualservice-cd3bab2c-1091-4d31-956d-ef0aee80bbc6","report_timestamp":"2021-05-26T17:40:01.744394Z","service_engine":"s1-ako-se-kmafa","vcpu_id":0,"log_id":5082,"client_ip":"10.10.15.128","client_src_port":45254,"client_dest_port":443,"client_rtt":1,"ssl_version":"TLSv1.2","ssl_cipher":"ECDHE-ECDSA-AES256-GCM-SHA384","sni_hostname":"ghost.avi.iberia.local","http_version":"1.0","method":"HEAD","uri_path":"/","user_agent":"avi/1.0","host":"ghost.avi.iberia.local","etag":"W/\"5c4a-r+7DuBoSJ6ifz7nS1cluKPsY5VI\"","persistent_session_id":3472328296598305370,"response_content_type":"text/html; charset=utf-8","request_length":83,"cacheable":true,"http_security_policy_rule_name":"RATE_LIMIT_10CPS","http_request_policy_rule_name":"S1-AZ1--default-ghost.avi.iberia","pool":"pool-6bf69a45-7f07-4dce-8e4e-7081136b31bb","pool_name":"S1-AZ1--default-ghost.avi.iberia.local_-ghost","server_ip":"10.34.3.3","server_name":"10.34.3.3","server_conn_src_ip":"10.10.14.20","server_dest_port":2368,"server_src_port":38549,"server_rtt":2,"server_response_length":288,"server_response_code":200,"server_response_time_first_byte":52,"server_response_time_last_byte":52,"response_length":1331,"response_code":200,"response_time_first_byte":52,"response_time_last_byte":52,"compression_percentage":0,"compression":"NO_COMPRESSION_CAN_BE_COMPRESSED","client_insights":"","request_headers":65,"response_headers":2060,"request_state":"AVI_HTTP_REQUEST_STATE_SEND_RESPONSE_HEADER_TO_CLIENT","all_request_headers":{"User-Agent":"avi/1.0","Host":"ghost.avi.iberia.local","Accept":"*/*"},"all_response_headers":{"Content-Type":"text/html; charset=utf-8","Content-Length":23626,"Connection":"close","X-Powered-By":"Express","Cache-Control":"public, max-age=0","ETag":"W/\"5c4a-r+7DuBoSJ6ifz7nS1cluKPsY5VI\"","Vary":"Accept-Encoding","Date":"Wed, 26 May 2021 17:40:02 GMT","Strict-Transport-Security":"max-age=31536000; includeSubDomains"},"headers_sent_to_server":{"X-Forwarded-For":"10.10.15.128","Host":"ghost.avi.iberia.local","Connection":"keep-alive","User-Agent":"avi/1.0","Accept":"*/*","X-Forwarded-Proto":"https","SHA1-hash":"8d8bc49ef49ac3b70a059c85b928953690700a6a"},"headers_received_from_server":{"X-Powered-By":"Express","Cache-Control":"public, max-age=0","Content-Type":"text/html; charset=utf-8","Content-Length":23626,"ETag":"W/\"5c4a-r+7DuBoSJ6ifz7nS1cluKPsY5VI\"","Vary":"Accept-Encoding","Date":"Wed, 26 May 2021 17:40:02 GMT","Connection":"keep-alive","Keep-Alive":"timeout=5"},"server_connection_reused":true,"vs_ip":"10.10.15.162","waf_log":{"status":"PASSED","latency_request_header_phase":210,"latency_request_body_phase":477,"latency_response_header_phase":19,"latency_response_body_phase":0,"rules_configured":true,"psm_configured":true,"application_rules_configured":false,"allowlist_configured":false,"allowlist_processed":false,"rules_processed":true,"psm_processed":true,"application_rules_processed":false},"request_id":"Lv-scVJ-2Ivw","servers_tried":1,"jwt_log":{"is_jwt_verified":false}}Use your favourite log collector tool to extract the different fields contained in the syslog file and you can get nice graphics very easily. As an example, using vRealize Log Insights you can see the syslog events sent by AVI via syslog over the time.

This other example shows the average backend server RTT over time grouped by server IP (i.e POD).

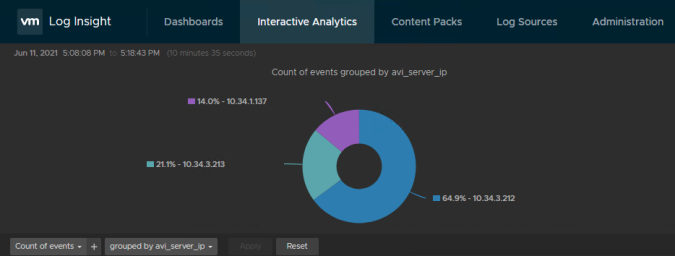
Or even this one that shows the percentage of requests accross the pods.
errorPageProfile
The last configurable parameter so far is the errorPageProfile which can be use to produce custom error page responses adding relevant information that might be used to trace issues or simply to provide cool error page to your end users. As with previous settings, the first step is to preconfigure the custom error Page Profile using the GUI. Navitate to Templates > Error Page and create a new profile that we will call GHOST-ERROR-PAGE.

We will create a custom page to warn the users they are trying to access the website using a forbidden method. When this happens a 403 Code is generated and a customized web page can be returned to the user. I have used one cool page that displays the forbidden city. The HTML code is available here.

Once the Error Page profile has been created now is time to reference to customize our application using the HostRule CRD as shown below
kubectl edit HostRule ghost

apiVersion: ako.vmware.com/v1alpha1
kind: HostRule
metadata:
  name: ghost
  namespace: default
spec:
  virtualhost:
    enableVirtualHost: true
    fqdn: ghost.avi.iberia.local
    tls:
      sslKeyCertificate:
        name: System-Default-Cert-EC
        type: ref
      sslProfile: CUSTOM_SSL_PROFILE
      termination: edge
    httpPolicy:
      policySets:
      - MY_RATE_LIMIT
      overwrite: false
    datascripts:
    - Compute_Host_HMAC
    wafPolicy: GHOST-WAF-POLICY
    applicationProfile: GHOST-HTTPS-APP-PROFILE
    analyticsProfile: GHOST-ANALYTICS-PROFILE
    errorPageProfile: GHOST-ERROR-PAGE
Verify the new configuration has been successfuly applied to our Virtual Service.

Now repeat the XSS attack attempt as shown in the wafPolicy section above and you can see how a beatufil custom message appears instead of the bored static 403 Forbidden shown before.

This finish this article. The next one will cover the customization of the backend/pool associated with our application and how you can also influence in the LoadBalancing algorithm, persistence, reencryption and other funny stuff.
