
In that section we will focus on the secure ingress services which is the most common and sensible way to publish our service externally. As mentioned in previous sections the ingress is an object in kubernetes that can be used to provide load balancing, SSL termination and name-based virtual hosting. We will use the previous used hackazon application to continue with our tests but now we will move from HTTP to HTTPS for delivering the content.
Dealing with Securing Ingresses in K8s
We can modify the Ingress yaml file definition to turn the ingress into a secure ingress service by enabling TLS.
apiVersion: networking.k8s.io/v1beta1
kind: Ingress
metadata:
  name: hackazon
  labels:
    app: hackazon
spec:
  tls:
  - hosts:
    - hackazon.avi.iberia.local
    secretName: hackazon-secret
  rules:
    - host: hackazon.avi.iberia.local
      http:
        paths:
        - path: /
          backend:
            serviceName: hackazon
            servicePort: 80
There are some new items if we compare with an insecure ingress definition file we discussed in the previous section. Note how the spec contains a tls field that has some attributes including the hostname and also note there is a secretName definition. The rules section are pretty much the same as in the insecure ingress yaml file.
The secretName field must point to a new type of kubernetes object called secret. A secret in kubernetes is an object that contains a small amount of sensitive data such as a password, a token, or a key. There’s a specific type of secret that is used for storing a certificate and its associated cryptographic material that are typically used for TLS . This data is primarily used with TLS termination of the Ingress resource, but may be used with other resources or directly by a workload. When using this type of Secret, the tls.key and the tls.crt key must be provided in the data (or stringData) field of the Secret configuration, although the API server doesn’t actually validate the values for each key. To create a secret we can use the kubectl create secret command. The general syntax is showed below:
kubectl create secret tls my-tls-secret \
  --cert=path/to/cert/file \
  --key=path/to/key/file
The public/private key pair must exist before hand. The public key certificate for --cert must be .PEM encoded (Base64-encoded DER format), and match the given private key for --key. The private key must be in what is commonly called PEM private key format and unencrypted. We can easily generate a private key and a cert file by using OpenSSL tools. The first step is creating the private key. I will use an Elliptic Curve with a ecparam=prime256v1. For more information about eliptic curve key criptography click here
openssl ecparam -name prime256v1 -genkey -noout -out hackazon.keyThe contents of the created hackazon.key file should look like this:
-----BEGIN EC PRIVATE KEY-----
MHcCAQEEIGXaF7F+RI4CU0MHa3MbI6fOxp1PvxhS2nxBEWW0EOzJoAoGCCqGSM49AwEHoUQDQgAE0gO2ZeHeZWBiPdOFParWH6Jk15ITH5hNzy0kC3Bn6yerTFqiPwF0aleSVXF5JAUFxJYNo3TKP4HTyEEvgZ51Q==
-----END EC PRIVATE KEY-----
In the second step we will create a Certificate Signing Request (CSR). We need to speciify the certificate paremeters we want to include in the public facing certificate. We will use a single line command to create the csr request. The CSR is the method to request a public key given an existing private key so, as you can imagine, we have to include the hackazon.key file to generate the CSR.
openssl req -new -key hackazon.key -out hackazon.csr -subj "/C=ES/ST=Madrid/L=Pozuelo/O=Iberia Lab/OU=Iberia/CN=hackazon.avi.iberia.local"The content of the created hackazon.csr file should look like this:
-----BEGIN CERTIFICATE REQUEST-----
MIIBNjCB3AIBADB6MQswCQYDVQQGEwJFUzEPMA0GA1UECAwGTWFkcmlkMRAwDgYDVQQHDAdQb3p1ZWxvMRMwEQYDVQQKDApJYmVyaWEgTGFiMQ8wDQYDVQQLDAZJYmVyaWExIjAgBgNVBAMMGWhhY2them9uLmF2aS5pYmVyaWEubG9jYWwwWTATBgcqhkjOPQIBBggqhkjOPQMBBwNCAATSA7Zl4d5lYGI904U9qtYfomTXkhMfmE3PLSTMLcGfrJ6tMWqI/AXRqV5JVcXkkBQXElg2jdMo/gdPIQS+BnnVoAAwCgYIKoZIzj0EAwIDSQAwRgIhAKt5AvKJ/DvxYcgUQZHK5d7lIYLYOULIWxnVPiKGNFuGAiEA3Ul99dXqon+OGoKBTujAHpOw8SA/Too1Redgd6q8wCw=
-----END CERTIFICATE REQUEST-----
Next, we need to sign the CSR. For a production environment is highly recommended to use a public Certification Authority to sign the request. For lab purposes we will self-signed the CSR using the private file created before.
openssl x509 -req -days 365 -in hackazon.csr -signkey hackazon.key -out hackazon.crt
Signature ok
subject=C = ES, ST = Madrid, L = Pozuelo, O = Iberia Lab, OU = Iberia, CN = hackazon.avi.iberia.local
Getting Private key
The output file hackazon.crt contains the new certificate encoded in PEM Base66 and it should look like this:
-----BEGIN CERTIFICATE-----
MIIB7jCCAZUCFDPolIQwTC0ZFdlOc/mkAZpqVpQqMAoGCCqGSM49BAMCMHoxCzAJBgNVBAYTAkVTMQ8wDQYDVQQIDAZNYWRyaWQxEDAOBgNVBAcMB1BvenVlbG8xEzARBgNVBAoMCkliZXJpYSBMYWIxDzANBgNVBAsMBkliZXJpYTEiMCAGA1UEAwwZaGFja2F6b24uYXZpLmliZXJpYS5sb2NhbDAeFw0yMDEyMTQxODExNTdaFw0yMTEyMTQxODExNTdaMHoxCzAJBgNVBAYTAkVTMQ8wDQYDVQQIDAZNYWRyaWQxEDAOBgNVBAcMB1BvenVlbG8xEzARBgNVBAoMCkliZXJpYSBMYWIxDzANBgNVBAsMBkliZXJpYTEiMCAGA1UEAwwZaGFja2F6b24uYXZpLmliZXJpYS5sb2NhbDBZMBMGByqGSM49AgEGCCqGSM49AwEHA0IABNIDtmXh3mVgYj3ThT2q1h+iZNeSEx+YTc8tJMwtwZ+snq0xaoj8BdGpXklVxeSQFBcSWDaN0yj+B08hBL4GedUwCgYIKoZIzj0EAwIDRwAwRAIgcLjFh0OBm4+3CYekcSG86vzv7P0Pf8Vm+y73LjPHg3sCIH4EfNZ73z28GiSQg3n80GynzxMEGG818sbZcIUphfo+
-----END CERTIFICATE-----
We can also decode the content of the X509 certificate by using the openssl tools to check if it actually match with our subject definition.
openssl x509 -in hackazon.crt -text -noout
Certificate:
    Data:
        Version: 1 (0x0)
        Serial Number:
            33:e8:94:84:30:4c:2d:19:15:d9:4e:73:f9:a4:01:9a:6a:56:94:2a
        Signature Algorithm: ecdsa-with-SHA256
        Issuer: C = ES, ST = Madrid, L = Pozuelo, O = Iberia Lab, OU = Iberia, CN = hackazon.avi.iberia.local
        Validity
            Not Before: Dec 14 18:11:57 2020 GMT
            Not After : Dec 14 18:11:57 2021 GMT
        Subject: C = ES, ST = Madrid, L = Pozuelo, O = Iberia Lab, OU = Iberia, CN = hackazon.avi.iberia.local
        Subject Public Key Info:
            Public Key Algorithm: id-ecPublicKey
                Public-Key: (256 bit)
                pub:
                    04:d2:03:b6:65:e1:de:65:60:62:3d:d3:85:3d:aa:
                    d6:1f:a2:64:d7:92:13:1f:98:4d:cf:2d:24:cc:2d:
                    c1:9f:ac:9e:ad:31:6a:88:fc:05:d1:a9:5e:49:55:
                    c5:e4:90:14:17:12:58:36:8d:d3:28:fe:07:4f:21:
                    04:be:06:79:d5
                ASN1 OID: prime256v1
                NIST CURVE: P-256
    Signature Algorithm: ecdsa-with-SHA256
         30:44:02:20:70:b8:c5:87:43:81:9b:8f:b7:09:87:a4:71:21:
         bc:ea:fc:ef:ec:fd:0f:7f:c5:66:fb:2e:f7:2e:33:c7:83:7b:
         02:20:7e:04:7c:d6:7b:df:3d:bc:1a:24:90:83:79:fc:d0:6c:
         a7:cf:13:04:18:6f:35:f2:c6:d9:70:85:29:85:fa:3e
Finally once we have the cryptographic material created, we can go ahead and create the secret object we need using regular kubectl command line. In our case we will create a new tls secret that we will call hackazon-secret using our newly created cert and private key files.
kubectl create secret tls hackazon-secret --cert hackazon.crt --key hackazon.key
secret/hackazon-secret created
I have created a simple but useful script available here that puts all this steps together. You can copy the script and customize it at your convenience. Make it executable and invoke it simply adding a friendly name, the subject and the namespace as input parameters. The script will make all the job for you.
./create-secret.sh my-site /C=ES/ST=Madrid/CN=my-site.example.com default

      Step 1.- EC Prime256 v1 private key generated and saved as my-site.key

      Step 2.- Certificate Signing Request created for CN=/C=ES/ST=Madrid/CN=my-site.example.com
Signature ok
subject=C = ES, ST = Madrid, CN = my-site.example.com
Getting Private key

      Step 3.- X.509 certificated created for 365 days and stored as my-site.crt

secret "my-site-secret" deleted
secret/my-site-secret created

      Step 4.- A TLS secret named my-site-secret has been created in current context and default namespace

Certificate:
    Data:
        Version: 1 (0x0)
        Serial Number:
            56:3e:cc:6d:4c:d5:10:e0:99:34:66:b9:3c:86:62:ac:7e:3f:3f:63
        Signature Algorithm: ecdsa-with-SHA256
        Issuer: C = ES, ST = Madrid, CN = my-site.example.com
        Validity
            Not Before: Dec 16 15:40:19 2020 GMT
            Not After : Dec 16 15:40:19 2021 GMT
        Subject: C = ES, ST = Madrid, CN = my-site.example.com
        Subject Public Key Info:
            Public Key Algorithm: id-ecPublicKey
                Public-Key: (256 bit)
                pub:
                    04:6d:7b:0e:3d:8a:18:af:fc:91:8e:16:7b:15:81:
                    0d:e5:68:17:80:9f:99:85:84:4d:df:bc:ae:12:9e:
                    f4:4a:de:00:85:c1:7e:69:c0:58:9a:be:90:ff:b2:
                    67:dc:37:0d:26:ae:3e:19:73:78:c2:11:11:03:e2:
                    96:61:80:c3:77
                ASN1 OID: prime256v1
                NIST CURVE: P-256
    Signature Algorithm: ecdsa-with-SHA256
         30:45:02:20:38:c9:c9:9b:bc:1e:5c:7b:ae:bd:94:17:0e:eb:
         e2:6f:eb:89:25:0b:bf:3d:c9:b3:53:c3:a7:1b:9c:3e:99:28:
         02:21:00:f5:56:b3:d3:8b:93:26:f2:d4:05:83:9d:e9:15:46:
         02:a7:67:57:3e:2a:9f:2c:be:66:50:82:bc:e8:b7:c0:b8
Once created we can see the new object using the Octant GUI as displayed below:

We can also the display the yaml defintion for that particular secret if required

Once we have the secret ready to use, let’s apply the secure ingress yaml file definition. The full yaml including the Deployment and the ClusterIP service definition can be accesed here.
kubectl apply -f hackazon_secure_ingress.yamlAs soon as the yaml file is pushed to the kubernetes API, the AKO will translate this ingress configuration into API calls to the AVI controller in order to realize the different configuration elements in external Load Balancer. That also includes the uploading of the secret k8s resource that we created before in the form of a new certificate that will be used to secure the traffic directed to this Virtual Service. This time we have changed the debugging level of AKO to DEBUG. This outputs humongous amount of information. I have selected some key messages that will help us to understand what is happening under the hood.
Exploring AKO Logs for Secure Ingress Creation
# An HTTP to HTTPS Redirection Policy has been created and attached to the parent Shared L7 Virtual service
2020-12-16T11:16:38.337Z        DEBUG   rest/dequeue_nodes.go:1213      The HTTP Policies rest_op is [{"Path":"/api/macro","Method":"POST","Obj":{"model_name":"HTTPPolicySet","data":{"cloud_config_cksum":"2197663401","created_by":"ako-S1-AZ1","http_request_policy":{"rules":[{"enable":true,"index":0,"match":{"host_hdr":{"match_criteria":"HDR_EQUALS","value":["hackazon.avi.iberia.local"]},"vs_port":{"match_criteria":"IS_IN","ports":[80]}},"name":"S1-AZ1--Shared-L7-0-0","redirect_action":{"port":443,"protocol":"HTTPS","status_code":"HTTP_REDIRECT_STATUS_CODE_302"}}]},"name":"S1-AZ1--Shared-L7-0","tenant_ref":"/api/tenant/?name=admin"}},"Tenant":"admin","PatchOp":"","Response":null,"Err":null,"Model":"HTTPPolicySet","Version":"20.1.2","ObjName":""}

# The new object is being created. The certificate and private key is uploaded to the AVI Controller. The yaml contents are parsed to create the API POST call
2020-12-16T11:16:39.238Z        DEBUG   rest/dequeue_nodes.go:1213      The HTTP Policies rest_op is [{"Path":"/api/macro","Method":"POST","Obj":{"model_name":"SSLKeyAndCertificate","data":{"certificate":{"certificate":"-----BEGIN CERTIFICATE-----\nMIIB7jCCAZUCFDPolIQwTC0ZFdlOc/mkAZpqVpQqMAoGCCqGSM49BAMCMHoxCzAJ\nBgNVBAYTAkVTMQ8wDQYDVQQIDAZNYWRyaWQxEDAOBgNVBAcMB1BvenVlbG8xEzAR\nBgNVBAoMCkliZXJpYSBMYWIxDzANBgNVBAsMBkliZXJpYTEiMCAGA1UEAwwZaGFj\na2F6b24uYXZpLmliZXJpYS5sb2NhbDAeFw0yMDEyMTQxODExNTdaFw0yMTEyMTQx\nODExNTdaMHoxCzAJBgNVBAYTAkVTMQ8wDQYDVQQIDAZNYWRyaWQxEDAOBgNVBAcM\nB1BvenVlbG8xEzARBgNVBAoMCkliZXJpYSBMYWIxDzANBgNVBAsMBkliZXJpYTEi\nMCAGA1UEAwwZaGFja2F6b24uYXZpLmliZXJpYS5sb2NhbDBZMBMGByqGSM49AgEG\nCCqGSM49AwEHA0IABNIDtmXh3mVgYj3ThT2q1h+iZNeSEx+YTc8tJMwtwZ+snq0x\naoj8BdGpXklVxeSQFBcSWDaN0yj+B08hBL4GedUwCgYIKoZIzj0EAwIDRwAwRAIg\ncLjFh0OBm4+3CYekcSG86vzv7P0Pf8Vm+y73LjPHg3sCIH4EfNZ73z28GiSQg3n8\n0GynzxMEGG818sbZcIUphfo+\n-----END CERTIFICATE-----\n"},"created_by":"ako-S1-AZ1","key":"-----BEGIN EC PRIVATE KEY-----\nMHcCAQEEIGXaF7F+RI4CU0MHa3MbI6fOxp1PvxhS2nxBEWW0EOzJoAoGCCqGSM49\nAwEHoUQDQgAE0gO2ZeHeZWBiPdOFParWH6Jk15ITH5hNzy0kzC3Bn6yerTFqiPwF\n0aleSVXF5JAUFxJYNo3TKP4HTyEEvgZ51Q==\n-----END EC PRIVATE KEY-----\n","name":"S1-AZ1--hackazon.avi.iberia.local","tenant_ref":"/api/tenant/?name=admin","type":"SSL_CERTIFICATE_TYPE_VIRTUALSERVICE"}},"Tenant":"admin","PatchOp":"","Response":null,"Err":null,"Model":"SSLKeyAndCertificate","Version":"20.1.2","ObjName":""},{"Path":"/api/macro","Method":"POST","Obj":{"model_name":"Pool","data":{"cloud_config_cksum":"1651865681","cloud_ref":"/api/cloud?name=Default-Cloud","created_by":"ako-S1-AZ1","health_monitor_refs":["/api/healthmonitor/?name=System-TCP"],"name":"S1-AZ1--default-hackazon.avi.iberia.local_-hackazon","service_metadata":"{\"namespace_ingress_name\":null,\"ingress_name\":\"hackazon\",\"namespace\":\"default\",\"hostnames\":[\"hackazon.avi.iberia.local\"],\"svc_name\":\"\",\"crd_status\":{\"type\":\"\",\"value\":\"\",\"status\":\"\"},\"pool_ratio\":0,\"passthrough_parent_ref\":\"\",\"passthrough_child_ref\":\"\"}","sni_enabled":false,"ssl_profile_ref":"","tenant_ref":"/api/tenant/?name=admin","vrf_ref":"/api/vrfcontext?name=VRF_AZ1"}},"Tenant":"admin","PatchOp":"","Response":null,"Err":null,"Model":"Pool","Version":"20.1.2","ObjName":""},{"Path":"/api/macro","Method":"POST","Obj":{"model_name":"PoolGroup","data":{"cloud_config_cksum":"2962814122","cloud_ref":"/api/cloud?name=Default-Cloud","created_by":"ako-S1-AZ1","implicit_priority_labels":false,"members":[{"pool_ref":"/api/pool?name=S1-AZ1--default-hackazon.avi.iberia.local_-hackazon","ratio":100}],"name":"S1-AZ1--default-hackazon.avi.iberia.local_-hackazon","tenant_ref":"/api/tenant/?name=admin"}},"Tenant":"admin","PatchOp":"","Response":null,"Err":null,"Model":"PoolGroup","Version":"20.1.2","ObjName":""},

# An HTTP Policy is defined to allow the requests with a Header matching the Host field hackazon.iberia.local in the / path to be swithed towards to the corresponding pool
{"Path":"/api/macro","Method":"POST","Obj":{"model_name":"HTTPPolicySet","data":{"cloud_config_cksum":"1191528635","created_by":"ako-S1-AZ1","http_request_policy":{"rules":[{"enable":true,"index":0,"match":{"host_hdr":{"match_criteria":"HDR_EQUALS","value":["hackazon.avi.iberia.local"]},"path":{"match_criteria":"BEGINS_WITH","match_str":["/"]}},"name":"S1-AZ1--default-hackazon.avi.iberia.local_-hackazon-0","switching_action":{"action":"HTTP_SWITCHING_SELECT_POOLGROUP","pool_group_ref":"/api/poolgroup/?name=S1-AZ1--default-hackazon.avi.iberia.local_-hackazon"}}]},"name":"S1-AZ1--default-hackazon.avi.iberia.local_-hackazon","tenant_ref":"/api/tenant/?name=admin"}},"Tenant":"admin","PatchOp":"","Response":null,"Err":null,"Model":"HTTPPolicySet","Version":"20.1.2","ObjName":""}]
If we take a look to the AVI GUI we can notice the new elements that has been realized to create the desired configuration.
Exploring Secure Ingress realization at AVI GUI

First of all AVI represent the secure ingress object as an independent Virtual Service. Actually AKO creates an SNI child virtual service with the name S1-AZ1–hackazon.avi.iberia.local linked to parent shared virtual service S1-AZ1-Shared-L7-0 to represent the new secure hostname. The SNI virtual service is used to bind the hostname to an sslkeycert object. The sslkeycert object is used to terminate the secure traffic on the AVI service engine. In our above example the secretName field points to the secret hackazon-secret that is asssociated with the hostname hackazon.avi.iberia.local. AKO parses the attached secret object and appropriately creates the sslkeycert object in Avi. Note that the SNI virtual service does not get created if the secret object does not exist in a form of a secret Kubernetes resource.
From Dashboard, If we click on the virtual service and then if we hover on the Virtual Service we can see some of the properties that has been attached to our secure Virtual Service object. For example note the SSL associated certicate is S1-AZ1–hackazon.avi.iberia.local, there is also a HTTP Request Policy with 1 rule that has been automically added upon ingress creation.

If we click on the pencil icon we can see how this new Virtual Service object is a Child object whose parent object corresponds to S1-AZ1–Shared-L7-0 as mentioned before.

We can also verify how the SSL Certificate attached corresponds to the new created object pushed from AKO as we show in the debugging trace before.

If we go to Templates > Security > SSL/TLS Certificates we can open the new created certificate and even click on export to explore the private key and the certificate.

If we compare the key and the certificate with our generated private key and certificate it must be identical.

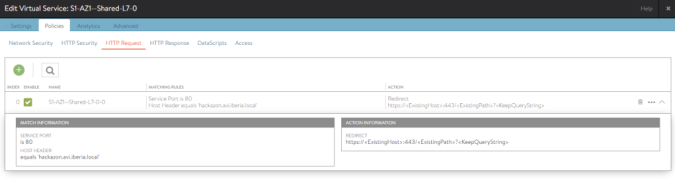
AKO creates also a HTTPpolicyset rule to route the terminated traffic to the appropate pool that corresponds to the host/path specifies in the rules section of our Ingress object. If we go Policies > HTTP Request we can see a rule applied to our Virtual Service with a matching section that will find a match if the Host header HTTP header AND the path of the URL begins with “/”. If this is the case the request will be directed to the Pool Group S1-AZ1–default-hackazon.avi.iberia.local_-hackazon that contains the endpoints (pods) that has been created in our k8s deployment.

As a bonus, AKO also creates for us a useful HTTP to HTTPS redirection policy on the shared virtual service (parent to the SNI child) for this specific secure hostname to avoid any clear-text traffic flowing in the network. This produces at the client browser an automatic redirection of an originating HTTP (tcp port 80) requests to HTTPS (tcp port 443) if they are accessed on the insecure port.
Capturing traffic to disect SSL transaction
The full sequence of events trigered (excluding DNS resolution) from a client that initiates a request to the non secure service at http://hackazon.avi.iberia.local is represented in the following sequence diagram.

To see how this happen from an end user perspective just try to access the virtual service using the insecure port (TCP 80) at the URL http://hackazon.avi.iberia.local with a browser. We can see how our request is automatically redirected to the secure port (TCP 443) at https://hackazon.avi.iberia.local. The Certificate Warning appears indicating that the used certificate cannot be verified by our local browser unless we add this self-signed certificate to a local certificate store.

If we proceed to the site, we can open the certificate used to encrypt the connection and you can identify all the parameters that we used to create the k8s secret object.

A capture of the traffic from the client will show how the HTTP to HTTPS redirection policy is implemented using a 302 Moved Temporarily HTTP code that will instruct our browser to redirect the request to an alternate URI located at https://hackazon.avi.iberia.local

The first packet that start the TLS Negotiation is the Client Hello. The browser uses an extension of the TLS protocol called Server Name Indication (SNI) that is commonly used and widely supported and allows the terminating device (in this case the Load Balancer) to select the appropiate certificate to secure the TLS channel and also to route the request to the desired associated virtual service. In our case the TLS negotiation uses hackazon.avi.iberia.local as SNI. This allows the AVI Service Engine to route the subsequent HTTPS requests after TLS negotiation completion to the right SNI Child Virtual Service.

If we explore the logs generated by our connection we can see the HTTPS headers that also shows the SNI Hostname (left section of image below) received from the client as well as other relevant parameters. If we capture this traffic from the customer we won’t be able to see this headers since they are encrypted inside the TLS payload. AVI is able to decode and see inside the payload because is terminating the TLS connection acting as a proxy.

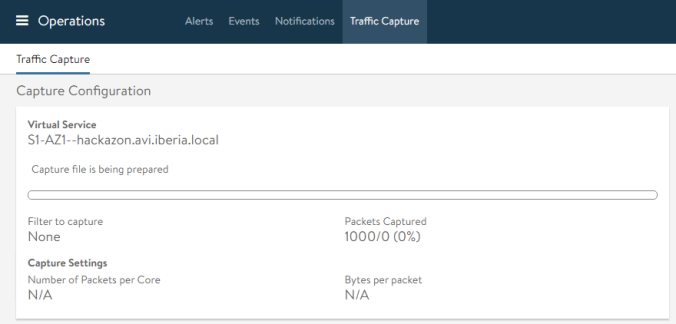
As you can notice, AVI provide a very rich analytics natively, however if we need even more deeper visitility, AVI has the option to fully capture the traffic as seen by the Service Engines. We can access from Operations > Traffic Capture.

Click pencil and select virtual service, set the Size of Packets to zero to capture the full packet length and also make sure the Capture Session Key is checked. Then click Start Capture at the bottom of the window.

If we generate traffic from our browser we can see how the packet counter increases. We can stop the capture at any time just clicking on the green slider icon.

The capture is being prepared and, after a few seconds (depending on the size of the capture) the capture would be ready to download.
When done, click on the download icon at the right to download the capture file

The capture is a tar file that includes two files: a pcapng file that contains the traffic capture and a txt file that includes the key of the session and will allow us to decrypt the payload of the TLS packet. You can use the popular wireshark to open the capture. We need to specifiy the key file to wireshark prior to openeing the capture file. If using the wireshark version for MacOS simply go to Wireshark > Preferences. Then in the Preferences windows select TLS under the protocol menu and browse to select the key txt file for our capture.

Once selected, click ok and we can now open the capture pcapng file and locate one of the TLS1.2 packets in the displayed capture…

At the bottom of the screen note how the Decrypte TLS option appears

Now we can see in the bottom pane some decrypted information that in this case seems to be an HTTP 200 OK response that contains some readable headers.

An easier way to see the contents of the TLS is using the Follow > TLS Stream option. Just select one of the TLS packets and right click to show the contextual menu.

We can now see the full converation in a single window. Note how the HTTP Headers that are part of the TLS payload are now fully readable. Also note that the Body section of the HTTP packet has been encoded using gzip. This is the reason we cannot read the contents of this particular section.

If you have interest in unzipping the Body section of the packet to see its content just go to File > Export Objects > HTTP and locate the packet number of your interest. Note that now, the content type that appears is the uncompressed content type, so e.g text/html, and not gzip.

Now we have seen how to create secure Ingress K8s services using AKO in a single kubernetes cluster. It’s time to explore beyond the local cluster and moving to the next level looking for multicluster services.
